
Farmers' Market Box 11-19-15
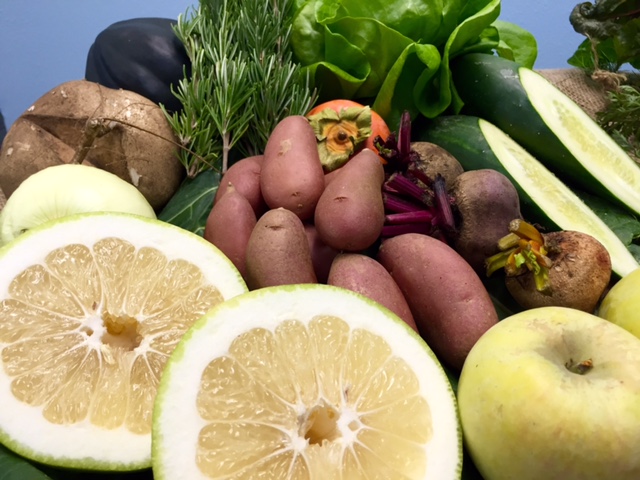

Fuji Apples – Fair Hill Apple Farm
Cucumbers – Tutti Frutti Farms
Oro Blanco Grapefruit – Ken’s Top Notch Produce
Collard Greens – Black Sheep Produce
Rosemary – Rutiz Family Farms
Jicama – Rutiz Family Farms
Hydroponic Butter Lettuce – Go Green Agriculture
Walla Walla Onions – Milliken Family Farm
Fuyu Persimmons – Penryn Orchard
French Heirloom Potatoes – Weiser Family Farm
Beet Trio – Kong Thao Farm
Acorn Squash – Black Sheep Produce
Organic Juicing Bag:
Baby Red Carrots – McGrath Family Farm
Electric Rainbow Chard – JF Organics
Cucumbers – Tutti Frutti Farms
Limes – Koral’s Tropical Fruit Farm
Fennel – Cal Organics
Farmer’s Choice:
Dragon Fruit – Tony Do’s Farm
Green Anjou Pears – Has Apple Farm
Satsuma Tangerines – Penryn Orchard
Feature: Date Night!
Honey Dates – Dates by Duvall
Catalina Offshore catch of the week:
Click here to Watch Video on YouTube
Post your photos on Instagram with the hashtag #specialtyproduceFMB or share them with the FMB community on our facebook page http://facebook.com/specialtyproduce!
When it’s about food…#specialtyproduce
Click the links above & search for products on our website with recipes attached
Below are some great recipes for you to try out with the produce from your box/bag. Let us know on our Facebook Page or through twitter if you tried any of them with the hastag #SpecialtyProduceFMB!
FMB JUICE RECIPES
Morning Chill
1 Cucumber
¼ Fennel Bulb
1 Lime
C if I Carrot
½ Bunch of Carrots
3 Chard Leaves
½ Cucumber
Leaf it to Me
¼ Fennel
3 Chard Leaves
3 Carrots
½ Lime
Specialty Produce Recipe Suggestions
courtesy of Diane Phillips (Cucina Divina)
Read through to the bottom for an exclusive Do-Ahead Thanksgiving Meal Plan!
French Fingerling and Collard Mash
Serves 4 to 6
1 pound French fingerlings, scrubbed and cut in half
1/3 cup extra virgin olive oil
2 to 3 thin slices of prosciutto cut into julienne
2 garlic cloves, minced
1 bunch collards, tough stems removed, and cut into 1/2-inch ribbons
Salt and pepper
1/2 cup warm milk
2 tablespoons unsalted butter, melted
1. Put the potatoes into water to cover, and bring to a boil. Simmer the potatoes for 12 to 15 minutes, until they are tender. Drain thoroughly, return to the pan, and keep warm.
2. While the potatoes are cooking, pour 1/4 cup of the oil into a large skillet, and saute the prosciutto for 2 to 3 minutes until it begins to get crisp.
3. Add the garlic and saute another 30 seconds, until fragrant.
4. Add the collards, season with salt and pepper, and saute until the collards begin to soften.
5. Add the milk to the skillet, and simmer another 5 minute, until the collards are tender.
6. Add the potatoes to the skillet, and mash the potatoes with the collard mixture. Stir in the butter, taste for seasoning and adjust using salt or pepper. Serve warm.
Maple Pecan Acorn Squash
Serves 4
1 acorn squash
1/4 cup unsalted butter, melted
1/3 cup maple syrup
Few drops Tabasco
1/2 cup chopped pecans
1. Preheat the oven to 400 degrees and line a baking sheet with a silicone baking liner or aluminum foil. Cut a slice off each end of the squash, then cut the squash in half horizontally and scoop out the seeds.
2. In a small bowl, combine the butter, syrup and Tabasco.
3. Drizzle over the inside of the squash, and bake for 30 minutes.
4. Sprinkle each half with the pecans, and bake another 30 minutes, until the squash is tender when pierced with the sharp tip of a paring knife.
5. Cut each half of the squash in half to serve, and drizzle with the maple butter.
Butter Lettuce Shrimp Wraps
Serves 4
One head of red butter lettuce, washed and spun dry, separated into leaves
2 tablespoons vegetable oil
1/2 cup finely chopped onion
1 garlic clove, minced
One pound medium or large shrimp, peeled, deveined, and tails removed
1 to 2 tablespoons soy sauce
1 tablespoon lemon juice
1 1/2 cups jicama, julienned
2 tablespoons finely chopped mint or basil
1 cup cucumber, peeled, and diced
2 to 3 tablespoons rice vinegar
2 tablespoons sugar
1 to 2 drops Tabasco
1. In a skillet, heat the oil; saute the onion and garlic for 2 to 3 minutes, until the onion is softened. Add the shrimp, saute until the shrimp turns pink. Add the soy sauce, and lemon juice, and remove from the heat.
2. Load the lettuce with the shrimp mixture. In a small bowl, combine the jicama, mint and cucumber. Drizzle with the rice vinegar, sugar and Tabasco. Toss to combine. Top the shrimp with the slaw, and serve.
Tri-Color Beet Salad
Serves 4
One bunch beets, scrubbed, tops removed and reserved (see note)
1/2 cup thinly sliced onion
1/4 cup orange juice
1 Tbs. white wine vinegar
1 tsp. fresh lemon juice
1 teaspoon sugar
Salt and Freshly ground pepper
1. Preheat the oven to 400 degrees and line baking sheets with aluminum foil, silicone liners or parchment.
2. Place the beets on the baking sheet, and roast for 40 minutes, or until the beets are tender.
3. When the beets are cool enough, slip the skin off the beets, and slice the beets 1/2-inch thick and put into a bowl.
4. Add the onion to the bowl.
5. In another bowl, whisk together the juice, vinegar, lemon juice, and sugar. Season with salt and pepper, and pour over the beets in the bowl. Toss to coat. Serve the beets at room temperature.
Fuyu Cranberry Sauce
Makes 2 to 3 cups
1 1/2 cups red port
1 1/2 cup firmly packed brown sugar
2 star anise
1 teaspoon grated orange zest
One 12-ounce bag cranberries, washed and drained
1 1/2 cups Fuyu persimmons, peeled, cored, and cut into 1/2-inch dice
1/2 teaspoon ground ginger
1. In a saucepan, combine the port, brown sugar, star anise, and orange zest. Bring to a boil, and simmer for 10 minutes, to reduce the liquid.
2. Remove the star anise; add the cranberries, persimmons, and ginger.
3. Simmer for 10 minutes, until the cranberries have split, and the persimmons are tender. Cool, cover and refrigerate the cranberry sauce.
4. Serve cold, the sauce can keep for up to 1 week in the refrigerator, or you can freeze it for 3 months.
Quinoa and spinach salad with Lemon Vinaigrette
Serves 6
For the Quinoa:
1/2 cup quinoa
1 cups chicken broth
1. Bring quinoa and broth to a boil in a medium saucepan.
2. Reduce heat to low, cover and simmer until tender and most of the liquid has been absorbed, 15 to 20 minutes. Fluff with a fork. Cool the quinoa.
For the Salad:
4 cups baby spinach
2 thin slices red onion, cut into 1/2 moons
2 Fuji apples, cored and chopped
1/2 cup vegetable oil
1/4 cup lemon juice
1/4 cup orange juice
Grated zest of 1 lemon
1 teaspoon grated orange zest
2 tablespoons honey
Salt and pepper
1. Put the spinach in to a salad bowl, and add the onion and apples.
2. In another bowl, whisk together the oil, lemon juice, orange juice, zests, and honey. Season with salt and pepper.
3. Toss the quinoa with some of the dressing, and add to the spinach.
4. Toss the spinach and quinoa with the remaining dressing, and serve.
Oro Blanco Sangria
Serves 6
1 750 mL bottle Riesling
1 cup Oro Blanco grapefruit juice
1/2 cup simple syrup**
1 1/2 cups sliced strawberries
1 grapefruit, cut into thin slices
1 750mL bottle Prosecco (or a dry champagne)
1. In a mixing bowl, combine the Riesling, grapefruit juice, simple syrup, strawberries and grapefruit. Cover and refrigerate for at least 4 hours, or up to 2 days.
2. When ready to serve, put a slice of grapefruit into a wine glass, along with a few slices of strawberries. Pour some of the Sangria base into a wine glass, top off with Prosecco, and serve cold.
3. To Make Simple Syrup: Bring 1 cup of water and 1/2 cup sugar to boil, and stir until the sugar is melted. Cool the syrup and store in the refrigerator for up to 2 weeks.
Cranberry Brie Bites
Makes about 48
These are a great bite to serve before dinner, and they can be frozen before baking.
One 17.5-ounce package Pepperidge Farm frozen puff pastry, defrosted
1 cup Rosemary Cranberry Sauce (recipe follows)
One 1/2-pound wedge Brie
1 large egg, beaten with 2 tablespoons water
1. Cut the Brie in 1/2-inch-thick slices and cut each slice into strips 1 inch long.
2. Roll out each puff pastry sheet into a 16-inch square. Cut each square into 2-inch squares. Place a square into a muffin tin cup and spoon in 1 teaspoon of the cranberry sauce in the middle of the dough. Lay a piece of Brie on top of the sauce. Draw up the corners of the dough toward the center and twist together to seal. Brush with a bit of the egg wash. (If you are freezing the pastries, don’t brush with the egg wash.) Repeat until you have used up all the pastry.
3. Do-Ahead: At this point, you can cover and refrigerate for up to 8 hours or freeze in the tins, then transfer to a zipper-top plastic bag and keep frozen for 5 weeks.
4. Preheat the oven to 400°F. Bake until golden brown, 12 to 14 minutes. If the pastries are frozen, place the pastries on a baking sheet lined with a silicone liner, parchment paper, or aluminum foil and brush with the egg wash. Bake frozen pastries at 375 degrees for 17 to 20 minutes until golden brown. Serve warm or at room temperature.
Rosemary Cranberry Sauce
Makes about 3 cups
This piquant sauce is delicious to serve at holiday time. Offer it as an accompaniment to poultry or pork, spoon it over blocks of cream cheese to spread on crackers or cucumber rounds.
2 tablespoons unsalted butter
1/2 cup chopped onion
2 tablespoons chopped fresh rosemary
One 12-ounce bag fresh cranberries, picked over for stems
1 1/2 cups sugar
1/2 cup water
Grated zest of 1 lemon
1. Melt the butter in a 3-quart saucepan over medium heat. Add the onion and rosemary, and cook, stirring, until the onion softens, 3 to 4 minutes. Add the remaining ingredients, bring to a boil, and continue boiling until the cranberries begin to pop and the mixture begins to thicken, 4 to 6 minutes.
2. Reduce the heat to medium-low and simmer for another 10 minutes, until the sauce is thickened and the cranberries have all popped, releasing their juices.
3. Remove from the heat and let cool to room temperature.
4. Do-Ahead: At this point, you can cover and refrigerate for up to 2 weeks or freeze for up to 2 months. Serve cold or at room temperature.
Farmers’ Choice:
Dragon Fruit Spritzer
Serves 2
1 dragon fruit
3 tangerines, peeled, and segmented
3 tablespoons lime juice
2 tablespoons honey
4 mint leaves
2 cups ice
1 to 2 cups sparkling water
1. Peel the dragon fruit, and put the flesh into a blender. Add the tangerines, lime juice, honey and mint.
2. Blend until smooth.
3. Add the ice, and 1 cup of sparkling water. Blend, pour the liquid into tall glasses, and top off with additional sparkling water if desired.
4. Cook’s Note: Instead of the sparkling water, you can use Prosecco or sparkling wine.
Tangerine Cranberry Sauce
Makes 4 to 5 cups
1 1/2 cups tangerine juice
3 cups cranberries, washed
1 cup packed light brown sugar
1/2 cup pure maple syrup, preferably grade B
1 cinnamon stick, broken in half
1/2 teaspoon ground ginger
4 tangerines, peeled, segmented, and coarsely chopped
1 cup pecan halves
1. In a saucepan, combine the juice, cranberries, sugar, maple syrup cinnamon and ginger.
2. Bring to a boil, add the tangerines, pecans, and simmer for 10 minutes.
3. Cool, cover and refrigerate for up to 5 days, or freeze for up to 4 months.
Tangerine Herb Butter
Makes 1 cup
An herb butter is terrific to use as a base for poultry or seafood. These butters freeze beautifully, giving you a burst of flavor for steamed vegetables, too.
1 cup unsalted butter, softened
1/3 cup tangerine juice
2 tablespoons Italian parsley
1 tablespoon rosemary
1 teaspoon tangerine zest
1/4 teaspoon ground pepper
1. Combine all the ingredients in a food processor, and process until the herbs are chopped, and the mixture comes together.
2. Remove to a piece of plastic wrap, and form into a log.
3. Wrap in the plastic wrap, and refrigerate for up to 5 days, or freeze for up to 3 months.
Meat Add-on Recommendations:
Beef Knuckle Stock
Makes about 4 cups stock
3 lb. beef knuckles
2 medium carrots cut into 1-inch chunks
2 medium yellow onions, quartered
1 sprig fresh thyme, 1 bay leaf, and 4 parsley stems
1 tablespoon black peppercorns
1 tablespoon tomato paste
4 to 5 cups water
Salt
1. Preheat the oven to 400 degrees, and line a baking sheet with aluminum foil. Put the bones on the baking sheet and bake for 25 minutes, until the bones begin to brown. Add the carrot and onion, and bake another 40 minutes.
2. Transfer the contents of the pan to a stock pot or Dutch oven; add the thyme, bay leaf, parsley, tomato paste, and water.
3. Bring the mixture to a boil, and simmer, uncovered for 4 to 5 hours, until the stock is flavorful.
4. Strain the broth, and discard the solids. Cool, cover and refrigerate the stock.
5. Skim the fat from the top of the stock before using. The stock can be refrigerated for 5 days, or frozen for 6 months.
6. The stock can be used as the base for beef stew, French onion soup or Vegetable beef soup.
Beef Knuckle Ragu
Makes about 4 cups
Serve this sauce over pappardelle or other wide pasta.
2 tablespoons extra virgin olive oil
2 garlic cloves, minced
1 medium onion, finely chopped
Salt and pepper
3 pounds beef knuckle
1/2 cup full bodied red wine
Two 28-ounce cans crushed tomatoes
1/4 cup finely chopped Italian parsley
Salt and pepper
1. In a Dutch oven, heat the oil; add the garlic and onion, sautéing for 2 to 3 minutes, until the onion begins to soften. Sprinkle the beef knuckles liberally with salt and pepper, and add to the pot, turning to coat with the oil and onion mixture. Add the wine and bring to a boil. Add the tomatoes, and bring to a simmer.
2. Simmer, uncovered for 1 hour, stirring occasionally.
3. Remove the beef knuckles from the sauce, scrape off any meat from the bones, and return to the sauce. Discard the bones, add the parsley, and season with salt and pepper.
4. Skim off any fat on the top of the sauce before serving.
5. Do-Ahead: The sauce will keep in the refrigerator for up to 5 days, or freeze for up to 6 months.
1. In a small saucier, combine the ingredients and bring to a boil.
2. Simmer the mixture for 5 to 10 minutes, until it becomes thick and syrupy. Strain out the zest, and cool the syrup.
A Do-Ahead Thanksgiving:
Since so much of this meal can be made and frozen, I’ve given two countdowns, one for refrigeration, and one for freezing. Remember that for every 5 pounds of weight it will take 24 hours to defrost.
Do-Ahead Refrigerator Countdown
1 week ahead
Prepare and refrigerate
Cranberry chutney
4 days ahead
Prepare and refrigerate
Sweet Potato and Apple Gratin
Do-Ahead Gravy
3 days ahead
Prepare and Refrigerate
Butternut Squash Soup
Old Fashioned Do-Ahead Stuffing
Parmesan Crusted Creamed Corn
Apple Cake
2 days ahead
Prepare and Refrigerate
Make Ahead Mashed Potatoes
1 day ahead
Prepare and refrigerate
Green Beans
Freezer Countdown:
3 months ahead
Cranberry Chutney
6 weeks ahead prepare and freeze
Make Ahead Gravy
1 month ahead, prepare and freeze
Make Ahead Mashed Potatoes
Sweet Potato Apple Gratin
Gulliver’s Creamed Corn
Apple Cake
Essentials for pulling off the Perfect Thanksgiving
1. Heavy Duty Roasting pan
2. Cuisipro Roasting Rack
3. Instant read meat thermometer
4. Probe meat thermometer
5. Sauce whisk
6. Saucier (3quart all-clad)
7. Silicone spatulas
8. Silicone pastry brush/baster
9. Oven to Table Bake ware (13-by-9-inch and 10-inch round)
10. Microplane
11. Carving knife
12. Carving fork
13. dial-a-slice apple corer slicer
14. Alligator
15. Fat separator (prefer Oxo)
16. Oxo regular peeler
17. Gravitti pepper mill
18. Sea salt
19. Thyme
20. Sage
21. Santuko/paring knife
22. Silicone food bands
23. Silpats
24. Mushroom slicer—
25. Joyce Chen Scissors
26. Pumpkin seed scooper (Have no idea what the real name is!)
27. Ice cream scoop
28. Gin!
APPROXIMATE ROASTING TIMES FOR TURKEY
The ONLY way to tell if the turkey is done is to roast it to 170 degrees internal temperature using either an instant read meat thermometer or a probe thermometer. The estimates below are only that—every oven is different and every bird is different, so get a thermometer and be safe.
Bake at 325 degrees-non-convection
Stuffed Turkey
4-8 pounds 2 ½ to 3 ½ hours
8-12 pounds 3 ½ to 4 ½ hours
12-16 pounds 4 ½ to 5 ½ hours
16-20 pounds 5 ½ to 6 ½ hours
20-24 6 ½ to 7 hours
For an unstuffed Turkey
8 to 12 pounds 2 ¾ to 3 hours
12 to14 pounds 3 to 3 ¾ hours
14 to 18 pounds 3 ¾ hours to 4 ¼ hours
18 to 20 pounds 4 ¼ to 4 ½ hours
Talking Turkey
1 Buy a FRESH turkey–if you can’t resist the bargains on frozen turkeys, buy one, but use it later for your family. Fresh birds taste better, and are juicier and tenderer.
2 Plan on 3/4 to 1 pound per person. This will allow leftovers for your guests to take home and for you to enjoy the next day. —I like to drape 5-6 slices of bacon over my bird, it gives the turkey a smoky flavor, but you don’t have to use anything, and your bird will brown, and have wonderful basting juices.
3 Make sure to roast the turkey on a rack in a heavy-duty roasting pan, that way the drippings will have a caramel color, and not be watery. Please don’t buy those flimsy aluminum pans in the supermarket.
4 While the turkey is cooking if it looks like it has browned to your liking but still has a way to go to be cooked through, loosely tent the turkey with foil for the rest of the cooking time.
5 **Remember that a turkey must rest for at least 30 to 45 minutes before carving. Use that time for any vegetables that need oven time.
Carving the Bird
Every year thousands of turkey lovers watch as their father or mother carves the turkey directly out of the oven resulting in a shredded mess, rather than beautifully sliced meat.
Patiently waiting for that nice slab of white meat or rich nuggets of dark meat, many people end up with shreds of meat, rather than nice slices because no one waited for the turkey to rest.
I recommend that you don’t carve at the table—first of all the table will be loaded with food, crystal, and chinaware, giving you a very small area to work in. Also, bringing a cutting board to the table takes away some of the ambiance and if the turkey is particularly juicy, the juices may run off the carving board and onto the table—this isn’t a good idea, period! And, I have seen more disasters with carving at the table than she cares to remember, with turkeys flying off the serving platter and dads having a few too many martinis before dinner and hacking away at the bird as if it’s a redwood—so take my advice, learn from my mistakes and carve in the kitchen. People will be congregated there, so you can dramatically pull the turkey out of the oven and show it off before allowing it to rest, and reheating your dishes.
Whenever you cook a piece of protein like a turkey, roast beef, or seafood, you need to let it rest a bit, so that the meat reaches its proper internal cooking temperature without over-cooking in the oven, and the juices will reabsorb into the meat making it much easier to carve.
You will need a sharp carving knife, so a few weeks before the main event have your knives sharpened (put it on your do-ahead calendar), so that they are ready. I recommend a carving knife that is hollow ground, meaning that it has what looks like scallops along the edge, but it’s not serrated. The scallops help the knife slide through the cooked meat, rather than drag through it.
If you have stuffed the turkey, immediately upon taking the turkey from the oven remove all the stuffing to a serving dish, cover with aluminum foil and keep warm in the oven. Allow your turkey to rest loosely covered with aluminum foil for at least 30 minutes, and don’t listen to those in the kitchen who are whispering, “It’s going to be cold.” I’ve taught this dinner so many times, and many times the turkey has been out of the oven for over an hour, and when we cut into it, I’m still burning my hands, because it’s retained its heat.
Remove the drumsticks by cutting through the joint that connects the drumstick to the thigh. Cut some of the meat off one drumstick and then leave the other whole on the platter. Slice down through the joint that attaches the thigh to the turkey, and then slice off the meat from the thighbone. Starting at the top of the breastbone, cut down along the breastbone following the contour of the meat along the bone, until you reach the bottom of the breast, and remove the entire piece of breast meat. Slice this piece across the grain into ½-inch thick slices, and rearrange on your serving platter. Repeat this process on the other side of the turkey. Garnish the platter with some parsley, thyme, and sage sprigs, and if you want to tap your “inner Martha”, fill hollowed out orange halves with whole fresh cranberries or cranberry chutney.
Do-Ahead Turkey
Everyone asks me if you can roast turkey ahead of time. The answer to this question is yes and no, it’s not my first choice but you can do it. Roast a turkey the day before, allow it to cool, and slice the meat. Arrange the meat in a baking dish and pour 1/2 to 1 cup of chicken or turkey broth over the turkey. Cover with aluminum foil and refrigerate overnight. On Thanksgiving Day, roast another turkey, as directed. When the turkey is roasted, remove from the oven and let it rest. Have the baking dish with your do-ahead turkey at room temperature and bake at 350°F, covered with aluminum foil, for 20 to 30 minutes until heated through. Carve the freshly roasted turkey and serve that first, then for second helpings, serve the other one.
Thanksgiving Day
Make sure that all your dishes are defrosted in the refrigerator
Roast the turkey according to the directions
30 minutes before the turkey is ready
• Remove all your side dishes and the bread pudding (if serving) from the refrigerator to come to room temperature
• Pour the gravy into a saucepan and bring to a simmer. Keep warm over low heat.
• When the turkey comes out of the oven—remove from the rack and cover loosely with aluminum foil.
• Turn oven heat to 350 degrees
• Remove the stuffing from the turkey, cover with foil and keep warm
• Place corn, potatoes, and sweet potatoes in the oven.
• Pour drippings into fat separator, and pour drippings into the gravy, whisking to blend. Keep warm over low heat.
• Reheat green beans and mushroom mixture.
After turkey has rested for 30 minutes (you can rest it for up to 1 hour) carve the turkey, and cover with aluminum foil. By the time the turkey has been carved, your side dishes should be baked, and you will be able to serve the dinner.
• Serve the soup, and then serve dinner.
• When you remove the side dishes from the oven, place the bread pudding or apple cake into the oven and allow it to bake while you are eating dinner. Even if you don’t eat it immediately after dinner, it can be reheated later.
Perfect Roast Turkey
Serves 12 to 14
Every year the national food magazines tout new ways to roast turkeys to make them more flavorful and juicy. I have taught this method to my students for over 15 years, and have never had one complain that their turkey is dry or tough. The most recent fad is “brining” which means that you soak the turkey in a salt-water solution overnight, then rinse and pat dry before roasting. The turkey absorbs the brine to make it juicier, but I’ve found that it makes it saltier and the consistency of the turkey meat is not pleasing to my taste. If you want to try a brined bird, roast a kosher chicken and see if you like the consistency of the meat. If you do, then buy a Butterball or kosher turkey for Thanksgiving because both have been brined—that way you don’t have to mess with a huge container of salted water with a turkey floating in it—it’s one less stress. Also, buy a fresh turkey, your grocery stores will giving away frozen turkeys (there’s a reason for that) I usually pick up the frozen bird and donate it to a shelter or keep it in the freezer and cook it later in the year. A fresh turkey has better flavor and I think it’s juicier and has better texture. A frozen 14 pound turkey will defrost in the refrigerator for 3 days. When figuring amounts of turkey to serve a crowd, I usually go with ½ pound per person if I want a few leftovers; ¾ pound per person for a day’s worth of leftovers and 1 pound per person if I want to send people home with doggie bags. I also recommend that you don’t cook a bird over 18 pounds because when turkeys get that large the ratio of meat to bone throws off your timing a bit. If you need 24 pounds of turkey, bake two 12 pounders, they are tenderer, cook in less time and you’ll be happier. Make sure to buy an instant read meat thermometer to gauge whether the turkey is cooked—the little plastic thermometers that come imbedded in turkeys that are sold commercially work on a moisture principle, so when that thing pops up, your turkey has turned to jerky!
One 12- to 14-pound fresh turkey
Salt and freshly ground black pepper to taste
1 onion, quartered
2 carrots cut into 1-inch lengths
3 ribs celery, cut into 1-inch lengths
6 strips bacon
1. Remove the neck and giblets from the turkey and set aside to make stock if you wish, or discard them. Rinse the turkey inside and out under cold running water and pat the inside and outside dry with paper towels. Sprinkle the cavity liberally with salt and pepper. [Diva Do-Ahead: At this point, you can cover and refrigerate for up to 3 days. Dry the inside of the turkey again if you store it for any length of time.]
2. Preheat the oven to 325°F. Put the onion, carrots, and celery inside the cavity and tie the legs together with cotton string. Transfer the turkey to a rack in a heavy-duty roasting pan. Drape the bacon over the turkey and roast for 1 1/2 hours, and then remove the bacon.
3. Continue roasting until an instant-read meat thermometer inserted into the thickest part of the thigh (behind the drumstick) without touching the bone registers 170° to 175°F, another 1 1/2 to 2 1/4 hours. If you would like to baste the turkey with pan drippings, start doing so after 2 hours. If the turkey is browned to your liking before, it reaches 170°F, loosely tent it with aluminum foil for the duration of the cooking time.
4. Remove the turkey from the oven, transfer to a cutting board, and cover with foil. Allow the turkey to rest for at least 30 minutes, and then carve as directed. See carving the bird.
Roasted Butternut Squash Soup with Candied Bacon Garnish
Serves 8
1/4 cup extra virgin olive oil
1 cup finely chopped sweet yellow onion
1 cup finely chopped peeled and cored firm red pears, about 2 cups
2 teaspoon dried thyme
1/4 teaspoon dried ginger
3 pounds peeled butternut squash cut into 1-inch pieces—should be about 6 to 7 cups
4 cups chicken broth
1 1/2 teaspoon salt
1/2 teaspoon freshly ground black pepper
1 cup heavy cream
1/4 cup finely chopped Italian parsley
1. Preheat the oven to 400 degrees and line 2 baking sheets with silicone baking liners or aluminum foil. In a large bowl, combine the oil, onion, pears, thyme, ginger and the butternut squash, tossing to coat with the oil and spices.
2. Spread the mixture onto the two prepared pans, and roast for 20 to 30 minutes until the squash is softened.
3. Transfer the squash mixture to a Dutch oven, stir in the broth, salt and pepper, and simmer for 15 to 20 minutes, until the squash begins to fall apart.
4. Using an immersion blender, puree the soup, or cool the soup and puree in a blender or food processor.
5. Do-Ahead: At this point the soup can be refrigerated for 3 days or frozen for up to 2 months, defrost before proceeding.
6. Add the cream, and parsley, and heat to serving temperature.
7. When ready to serve, reheat the soup and serve with crumbled candied bacon (see recipe below)
8. Serving suggestion: If you would like to serve this as an appetizer, serve it in “shooter” glasses, with a half slice of candied bacon as garnish.
Candied Bacon:
8 slices thick cut bacon
1/3 cup firmly packed dark brown sugar
1/8 teaspoon finely ground black pepper
1. Preheat the oven to 400 degrees.
2. Line a baking sheet with aluminum foil or a silicone baking liner, and place a rack into the baking sheet.
3. Lay the bacon across the baking sheet, but do not overlap the slices.
4. In a small bowl, combine the sugar and pepper, and sprinkle evenly over the bacon.
5. Bake for 8 to 10 minutes, until the bacon is crispy. Remove from the oven and allow to cool.
6. Do-Ahead: The crisp bacon can be stored in zip-lock bags in the freezer for up to 1 month, or refrigerated for up to 3 days.
7. Crumble the bacon, or if you are using it as a garnish for “shooters” cut each slice in half crosswise to use as a stirrer in the soup.
Make Ahead Gravy
Makes 4 cups
6 tablespoons flour
6 tablespoons butter or margarine
4 cups chicken broth or turkey stock
Drippings from the turkey
1. In a medium saucepan, melt the butter and whisk in the flour. Cook over medium high heat until the four is incorporated, and white bubbles begin to form on the top of the roux.
2. Cook the roux for 2 to 3 minutes, after the white bubbles have formed, whisking constantly.
3. Gradually add the broth, whisking constantly and stirring until the gravy is thickened, and comes to a boil.
4. Remove from the heat and season with salt and pepper. Diva Do-Ahead: Cool, cover and refrigerate 4 days or freeze for 6 weeks. Defrost before proceeding.
5. Thanksgiving Day: heat the gravy in a saucepan, and when the turkey is done, pour off all the drippings into a jar, or fat separator. Skim or spoon off all the fat and add the drippings to the gravy, and bring it to serving temperature.
What?? No Drippings? Some people swear by grilling, smoking, or deep-frying their turkeys, but they end up without drippings to stir into the gravy. Never fear! Two weeks before Thanksgiving roast a chicken or chicken parts, to give you some nice caramelized drippings to stir into your gravy—you can actually have the gravy ready to go on Thanksgiving if you choose to do it this way.
Tip: Keeping the gravy hot is always a dilemma, so here are two solutions. Buy a thermal gravy carafe or keep the gravy warm in a slow cooker. The other trick is to pour boiling water into your gravy boat about 15 minutes before serving. Pour the water out and the boat should remain warm for about ½ hour.
Thick or thin: If you like the gravy thicker, make a paste of 1 part flour to 1 part softened or melted butter, kneading the flour into the butter with a tablespoon. This is called a buerre manie, and is used to help thicken sauces. Whisk the buerre manie into the gravy after adding the drippings and bring back to a boil after each addition until the gravy is thickened to your preference.
Old Fashioned Do-Ahead Bread Stuffing
Makes enough to stuff a 14-18 pound bird
I’ve never met a stuffing I didn’t like, and this simple stuffing flavored with sage, thyme, onion and celery can be jazzed up with your favorite additions. Although you can buy herb seasoned bread cubes in the grocery store, I urge you to use stale bread and dry it out in the oven, and then add your own herbs, the difference is huge! If you are using leftover baguettes, with a hard crust, remove the tough parts of the crust, because they will absorb most of the liquid. I like to use a high quality white bread like Pepperidge Farm and include the crusts, as well.
1 cup butter or margarine
2 cups chopped celery
2 cups chopped onion
1 tablespoon finely chopped sage (or 1 teaspoon dried)
1 tablespoon finely chopped thyme leaves (or 1 teaspoon dried)
12 cups stale dry bread cubes
1 tablespoon salt
½ teaspoon ground pepper
1 ½ to 2 cups chicken broth
1 large egg
1. Cook the celery, onion, sage, and thyme in the butter over low heat and stir until the onions are golden.
2. Place the bread cubes in a large mixing bowl, and add the celery mixture, tossing to blend.
3. Pour broth over the stuffing ingredients, add the egg, and stir to blend. Taste the stuffing for seasoning and adjust adding more salt, pepper, or herbs.
4. Do-Ahead: At this point, the cooled stuffing can be refrigerated for up to 3 days, or frozen for 1 month.
5. Coat the inside of a 3-quart baking dish with non-stick cooking spray. Transfer the stuffing to the baking dish and bake 30 minutes, basting with turkey drippings or butter half way through the cooking time. If you put the stuffing into the turkey, it will roast according to our timing chart on p. 00.
Crowd-Pleaser: If you are serving a crowd, stuff the dressing into greased loaf pans and bake as directed. Turn the stuffing out of the loaf pans, and let rest for 5 minutes. Cut the stuffing with a serrated knife that has been coated with non-stick cooking spray and arrange the slices on a platter.
Wet or Dry: If you like crispy stuffing, don’t drown your bread cubes in liquid, and bake the stuffing outside the turkey. For those who like a moist stuffing, stuff it inside the turkey, or add more liquid to the stuffing and bake it covered with aluminum foil in the oven.
Variations to add while sautéing the onion and celery:
1 pound sliced mushrooms
½ pound crawfish tails
½ cup dried chopped apricots
½ cup dried cranberries
1 dozen oysters, chopped
1 cup pecan halves
Gulliver’s Creamed Corn
Serves 8 to 10
6 tablespoons (3/4 stick) unsalted butter, melted
2/3 cup freshly grated Parmesan cheese
1 1/2 cups heavy cream
Two 16-ounce bags frozen white corn, defrosted
1 1/2 teaspoons salt
1 teaspoon sugar
3 tablespoons all-purpose flour
1. Brush a 13 x 9-inch baking dish with some of the butter. Sprinkle 1/3 cup of the Parmesan over the bottom of the dish and tilt so the cheese is evenly distributed and adheres to the butter. (or if you would like, you can use 4-ounce ramekins for individual servings)
2. In a 4-quart saucepan, heat the cream until it begins to boil. Add the corn, salt, and sugar, and heat, stirring occasionally, until the mixture is almost at a boil
3. In the meantime, make a paste out of the remaining melted butter and the flour. Stir it into the mixture in the saucepan and cook until thickened and the liquid does come to a boil. Remove the pan from the heat, transfer the mixture to the prepared dish, and sprinkle with the remaining 1/3 cup of cheese.
4. Do-Ahead: At this point, you can let cool, cover, and refrigerate for up to 3 days or freeze for up to 1 month. Bring to room temperature before continuing.
5. Preheat the oven to 350°F. Bake the corn dish until bubbling and golden brown, about 30 minutes. (Individual ramekins will take about 15 to 20 minutes)
6. If you would prefer to skip the cream, try whole milk; it’s not as luxurious, but it does the job.
Make Ahead Mashed Potatoes
Serves 10 to 12
8 to 10 medium-size Russet baking potatoes, peeled and cut into 1-inch chunks (see note)
6 tablespoons (3/4 stick) unsalted butter, softened
¾ cup freshly grated Parmesan cheese
1 cup sour cream
One 8-ounce package cream cheese, softened
1/3 cup chopped fresh chives (optional)
Salt and freshly ground black pepper to taste
1. Boil the potatoes in salted water to cover until tender, and drain.
2. Rub a 13 x 9-inch baking dish with 2 tablespoons of the butter. Sprinkle ¼ cup of the Parmesan into the dish and tip the dish so the cheese is evenly distributed and adheres to the butter.
3. Place the hot cooked potatoes in a large bowl, add the sour cream, cream cheese, 2 tablespoons of the remaining butter, ¼ cup of the Parmesan, and the chives, if using. Using an electric mixer, beat the potatoes until smooth, taste for seasoning and adjust with salt and pepper. Transfer to the prepared dish, dot with the remaining 2 tablespoons of butter, and sprinkle with the remaining ¼ cup of cheese.
4. Do-Ahead: At this point, you can cover and refrigerate for 2 to 3 days or freeze for up to 1 month. Bring to room temperature before continuing.
5. Preheat the oven to 350°F. Bake the potatoes until golden, about 25 minutes. Serve hot.
Slow Cooker Savvy: These potatoes can be heated in a 4-quart slow cooker if you have a removable ceramic insert. Butter the insert and dust it with the cheese as directed above. Follow the recipe through step 3 and fill the insert with the mashed potatoes. Cover and cook on Low for 4 to 6 hours, until heated through. An extra dusting of Parmesan and butter makes them look divine.
Skins on or off? For Thanksgiving, I love pure white potatoes, but if you like to leave the skins on (and they are unblemished) then certainly do what your family enjoys. If there is a greenish tinge on the potato skin, you will need to remove it because it can make you sick, just peel the potato until the green is removed.
What kind? The best potatoes for mashing are Idaho baking potatoes, or Russet type potatoes. They are mealy and give you a fluffy potato dish. BUT, I also like to make mashed red skins and Yukon golds, they are just a bit waxier, so you won’t have the ethereal fluffy quality of the Russet, but you can still use them.
Sweet Potato and Apple Gratin
Serves 8
8 medium-size sweet potatoes (see note)
1/2 cup (1 stick) unsalted butter, melted
2/3 cup firmly packed light brown sugar
2/3 cup dark corn syrup
3 tablespoons cream sherry
1 1/2 teaspoons ground cinnamon
1/8 teaspoon ground nutmeg
4 medium-size Granny Smith or other tart apples, peeled, cored, and sliced 1/4 inch thick
1. Preheat the oven to 425 degrees. Poke a few holes in the sweet potatoes using the tip of a sharp paring knife, bake until tender when squeezed with an oven mitt, 50 to 60 minutes. When cool enough to handle, cut in half and scoop out the flesh.
2. Put the sweet potatoes in a large bowl. With an electric mixer, beat until smooth. Add 1/4 cup (1/2 stick) of the butter, the brown sugar, corn syrup, sherry, cinnamon, and nutmeg and blend until creamy.
3. Spread half the sweet potato mixture in a 10- to 12-inch pie plate 2 inches deep, or a 13 x 9-inch baking dish. Arrange half the apple slices over the yam layer and brush with some of the remaining butter. The butter will seal the apples and prevent discoloration. Spread the remaining sweet potato mixture over the apples and arrange the remaining apples on top in an attractive pattern. Brush with the remaining butter, covering the apples completely.
4. Do-Ahead: At this point, you can cover and refrigerate for up to 4 days or freeze for up to 1 month. Defrost and bring to room temperature before continuing.
5. Preheat the oven to 350°F. Bake the dish, uncovered, until the apples are golden brown, 30 to 40 minutes.
6. Note: If you would prefer to use canned sweet potatoes, use two 32-ounce cans sweet potatoes, drained and proceed as directed.
Green Beans with Sherried Onion and Mushrooms Sauce
Serves 6 to 8
Do-Ahead: Blanch the green beans in boiling water for 3 minutes, shock in cold water, drain, refrigerate in a zipper top plastic bag. On Thanksgiving Day, poke holes in the bag, and microwave the beans on high for 3 minutes. The sauce can be refrigerated for up to 3 days.
1 pound green beans, stemmed, and cut into 2 inch lengths
3 tablespoons butter
1 cup small pearl onions, peeled and sliced in half or left whole
½ pound sliced mushrooms
2 tablespoons flour
½ cup chicken stock
½ cup heavy cream
2 tablespoons Sherry
Salt, pepper, and a pinch of nutmeg
1. Bring 2 quarts water to a boil, and add the green beans. Simmer until the beans are crisp, but tender. Drain and season with salt and pepper.
2. In a 10 inch skillet, melt the butter, and add the onions, sautéing for three minutes.
3. Add the mushrooms and sauté until the mushrooms give off some of their liquid.
4. Add the flour, and stir, until blended.
5. Gradually stir in the stock, and whisk until thickened.
6. Add the cream and sherry, stirring, until the mixture thickens. Add the seasonings and refrigerate until ready to serve. When ready to serve, heat the sauce, and add the green beans to the sauce.
A Heads Up: Sauce is great over peas as well, or leftover sauce can be mixed with leftover turkey for a creamy alternative to leftover turkey with gravy.
Peeling Pearls: To easily peel pearl onions, toss them into boiling water and bring back to a boil, remove the onions, and drain. When they are cool enough to the touch cut off the base of the onion, and squeeze the onion out of its skin.
Cranberry Chutney
Makes about 4 1/2 cups
One 16-ounce can peach halves packed in syrup, drained and syrup reserved
One 12-ounce package fresh or frozen cranberries
1 1/2 cups sugar
1 medium-size onion, chopped
1 cup pecan halves
1/2 teaspoon ground cinnamon
1/4 teaspoon ground ginger
1. Coarsely chop the peaches and set aside.
2. Combine the cranberries, reserved peach syrup, sugar, and onion in a large saucepan over medium-high heat and cook until the cranberries begin to pop, about 10 minutes. Stir in the pecans, cinnamon, ginger, and peaches and cook 10 minutes longer.
3. Remove from the heat and let cool.
4. Do-Ahead: At this point, you can cover and refrigerate for up to a month or freeze for up to 3 months. Serve the chutney cold, warm, or at room temperature.
Hot Apple Cake with Toasted Caramel Pecan Sauce
Serves 14 to 16
Do-Ahead: Bake the cake 2 days ahead of time and refrigerate, or freeze for 1 month.
4 sticks butter
2 cups sugar
4 eggs
1 tablespoon vanilla
3 cups flour
1/2 teaspoons ground nutmeg
2 teaspoons ground cinnamon
2 teaspoons baking soda
5 medium Granny Smith apples, peeled, cored and finely chopped
1 cup chopped pecans
1. Preheat the oven to 350 degrees, and grease a 13-by-9-inch cake pan, or line a 15-by10-inch jellyroll pan with a silicone baking liner.
2. Beat the butter and sugar in a large bowl until light and fluffy.
3. Beat in the eggs, until well blended.
4. Add flour, spices, soda and beat until just incorporated.
5. Mix in the apples, nuts, and vanilla.
6. Spoon batter into prepared pan. Bake for 35-40 minutes for the 13-by-9-inch pan, 25 to 30 minutes for the sheet pan. Remove to a rack to cool. Wrap the cake in aluminum foil, and refrigerate or freeze the cake.
7. Reheat the cake, covered with foil in a 350 degree oven for 10 minutes before serving.
A Heads Up: This cake is delicious all by itself, but if you would like to make it and frost it, a cream cheese frosting is the best!
Toasted Pecan Caramel Sauce
Makes about 2 cups
Do-Ahead: Sauce keeps refrigerate for 2 weeks. Reheat in the microwave at 50% power or over low heat on the stovetop.
4 tablespoons butter
½ cup pecan halves
1 cup firmly packed light brown sugar
1 cup whipping cream
1. Melt the butter in a medium saucepan, over medium high heat.
2. Add the pecans and toast them in the butter for about 3 minutes.
3. Stir in the brown sugar, and stir until it melts.
4. Add the whipping cream, and cook, stirring constantly, until sauce boils, and sugar dissolves.
5. Refrigerate for up to 1 week. To serve, place a piece of warm cake onto dessert plate. Serve with a scoop of vanilla ice cream and spoon hot caramel pecan sauce over all.
A Head’s Up: This sauce is wonderful served over vanilla ice cream, or chocolate cake.
@Diane Phillips www.dianephillips.com www.cucinadivina.blogpot.com
Follow me on Facebook (professional page) Twitter and Pinterest
Have a Happy and Safe Thanksgiving!
Post your photos on Instagram with the hashtag #specialtyproduceFMB or share them with the FMB community on our facebook page http://facebook.com/specialtyproduce!
When it’s about food…#specialtyproduce
If you haven’t joined yet, you can order a bag for next week on our FMB page!